|
Using your phone's GPS
Navigation allows you to navigate from your
current location to your next destination.
Similar to a car GPS Navigation System, you may
have used your phone and Google Maps to
navigate. The focus of this page is on
using your phone to navigate while walking
to your next activity.
One of the most valuable
features of our
Mobile Trip Profile is the ability to set a
map navigation link
 for a location activity providing single click
access that will use your phone's GPS Navigation
to take you there. See our page in the
Pre-Travel Area for additional details on
Maps / Mobile GPS Map Navigation and
setting the actual map link in the Mobile
Trip Profile.
for a location activity providing single click
access that will use your phone's GPS Navigation
to take you there. See our page in the
Pre-Travel Area for additional details on
Maps / Mobile GPS Map Navigation and
setting the actual map link in the Mobile
Trip Profile.
Assuming you have
configured the Mobile Trip Profile with
the navigation links you intend to use for your
activities, when you have arrive, expand the
location and activity you are interested in and click the
icon to start the navigation process. If
you are walking, be sure you have selected the
'Walk' icon otherwise the app may try and take
you along a driving route which could end up
being much further and on streets where you
would not normally walk.
 Using your phone's GPS
Navigation can be very
battery intensive, draining it much faster than
typical use. See our page on
Battery Backup. Using your phone's GPS
Navigation can be very
battery intensive, draining it much faster than
typical use. See our page on
Battery Backup.
|
Wear OS by Google |
|
Be sure to
see our
Wear OS Wmartwatch page for
information on syncing a Wear
OS watch with your
Smartphone allowing you to use
Google Maps on your watch for
navigation. |
 |
Using a mobile
network when navigating
If you are connected
to your provider's mobile network, GPS
Navigation should work as it always does.
When traveling
internationally, depending on your service
plan, you may have mobile access at reduced
speeds while roaming on other networks.
You will be able to use maps in real-time,
but they can take longer to load.
Weak Signals
No matter where you
are, if you have a weak network signal, it
can take longer to connect, download maps
and you may find that you loose network
connectivity. GPS Navigation may work
while you have a signal but stop responding
when your signal is lost. This can be
frustrating, so you may want to consider
using downloaded offline maps as described
below; although that method has it's
limitations as well.
The compass
*** Important
***
When using your phone
to navigate, setting the compass is very
important. There should be a small
compass displayed somewhere on the
navigation page similar to the images below.
There are basically two compass settings
that can be switched simply by clicking on
the compass icon; both are explained below.
|
Compass Settings |
 |
 |
|
Map
on Phone Always Aligned to
North |
Map on Phone Fixed with North at
Top |
|
This setting
keeps the map displayed on the
screen aligned to north so that
it always matches the street
layout. No matter what
direction you turn, the map on
the screen stays aligned to
north, matching the streets.
*** This is the setting you want
***
You will
notice that the compass needle
will move so that it always
points to north no matter what
direction you may be facing, but
the map will stay fixed.
Think of
placing a map on the floor
aligned to north so that it
matches the street layout.
You then stand on the map where
you are located and turn in a a
circle. The map does not
move, it stays aligned to the
street layout.
Having
the compass in this setting
means that when you walk and
change direction, what you see
on your phone will match the
streets in front of you. |
This setting
keeps north at the top of the
map displayed on the screen no
matter what direction you may be
facing. Unless you are
facing north, the map will not
align to the streets.
Think of
placing a map on the floor
aligned to north so that it
matches the street layout.
You then stand on the map where
you are located and turn in a
circle. As you turn, the
map turns with you so that north
is always at the top in front of
any direction you are standing.
Once you turn away from north,
the map will no longer match the
street layout.
Having
your compass in this setting
means that when you walk and
change direction away from
north, what you see on your
phone will not match the streets
in front of you.
|
Calibrating the
Compass
If you notice that
the path you are taking is not
exactly in line with your phone's street display,
you may need to calibrate your phone's
compass.
The first and
easiest thing to try is to move your
phone around in a figure-8 pattern a few
times. The movement may help the
phone recognize your location and
direction to better align with the
streets.
As all phones are
different, you will probably need to
look up how to manually calibrate the
internal compass. The following
example is for a Samsung Galaxy S8.
- Select Phone
app
- Open keypad
- Enter *#0*#
- Select on
the 'Sensor' tile
- Scroll down
to 'Magnetic Sensor'
- Spin your
phone all the way around until it is
calibrated (will flash green)
- Repeatedly
tap the Back button until you're
back to the home screen
Downloading and
using offline maps
Ahead of time, from
a location where you have service,
use your phone and download offline maps of
locations you will be visiting. For
example, if you plan on walking around Paris
France, you can easily save an offline map.
Using an offline map will save on network
usage, increase response time and ensure you
have a map of the area should there be
limited or no mobile service.
See our page on
Offline Maps explaining how to download
and use an offline map.
Practice, practice,
practice
This may seem simple
and it is once you get it down, but be sure
you have it down.
Take your phone and
actually use it. Practice navigating
from your 'Current Location', Walking
to various
locations around your town. Practice
using navigation when you have network
service and by using downloaded offline maps
in Airplane Mode to disable network service.
|
Paris Navigation Example |
|
Depending on your phone
and the app you are using, your display may be
different but this should give you an idea of
what to expect. |
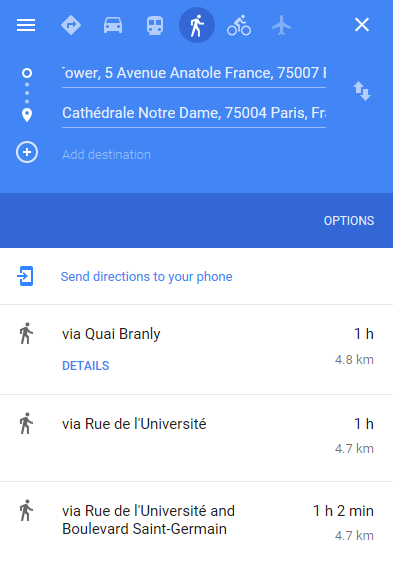 |
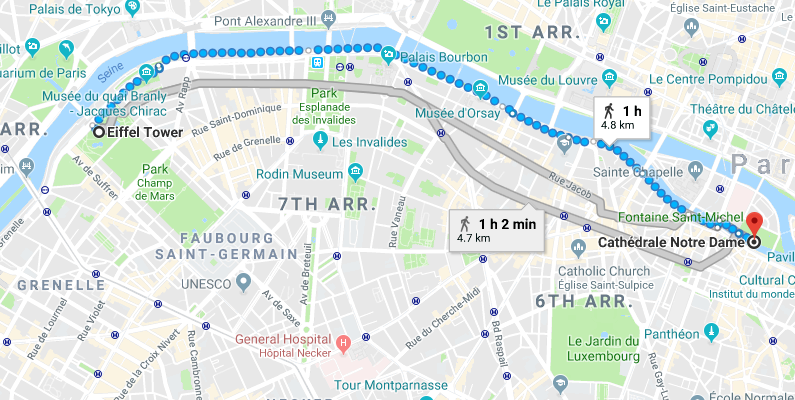
In
this example, we are navigating from our
current location which happens to be the
Eiffel Tower in Paris to the Notre Dame
Cathedral.
*
The most convenient and quickest way
would be to take the Metro, but it's a
nice day and we have decided to walk.
We
have selected the 'Walking' symbol
on the main navigation panel to the left to
be sure we get a walking route as driving
and bus routes would likely be
different.
On
your phone, something similar to the
display below should appear showing your
route. |
|
Paris Walking Route: Eiffel Tower to the
Notre Dame Cathedral |
 |
|